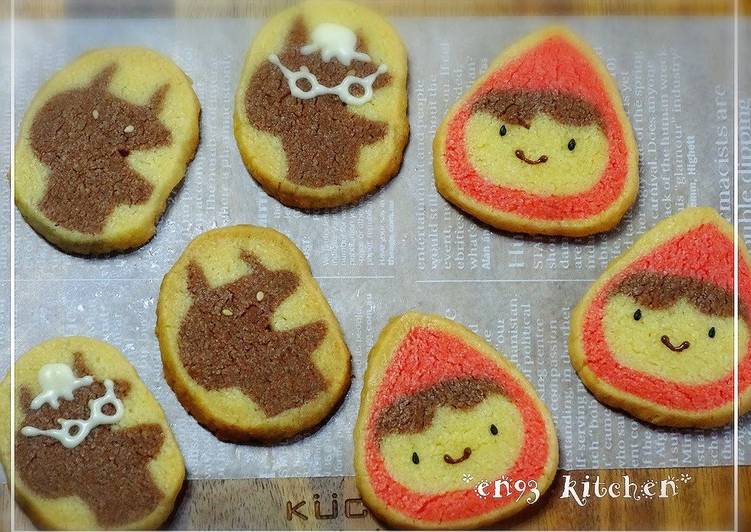
Hello everybody, it’s John, welcome to our recipe page. Today, I’m gonna show you how to make a special dish, cute little red riding hood icebox cookies. It is one of my favorites food recipes. This time, I’m gonna make it a bit tasty. This will be really delicious.
Cute Little Red Riding Hood Icebox Cookies is one of the most popular of recent trending foods in the world. It is simple, it is fast, it tastes yummy. It is enjoyed by millions every day. Cute Little Red Riding Hood Icebox Cookies is something which I have loved my whole life. They’re nice and they look wonderful.
Great recipe for Cute Little Red Riding Hood Icebox Cookies. I am currently experimenting with cute icebox cookies that are also crispy and delicious! I adjusted the amount of light brown sugar to suit my taste.
To get started with this particular recipe, we must prepare a few ingredients. You can cook cute little red riding hood icebox cookies using 9 ingredients and 63 steps. Here is how you cook it.
The ingredients needed to make Cute Little Red Riding Hood Icebox Cookies:
- Prepare 340 grams Cake flour
- Prepare 100 grams Raw cane sugar
- Take 180 grams Unsalted butter
- Prepare 1 Egg yolk
- Take 1 pinch Salt
- Take 5 drops off a toothpick Food coloring (red)
- Prepare 1 tbsp Cocoa powder (unsweetened)
- Get 1 White sesame and black sesame
- Prepare 1 Decoration chocolate
Watch as Miss Doughmestic creates Little Red Riding Hood. All designs are created and drawn by Miss Doughmestic. For more cookie decorating fun please. There are at least two types of reproduction Little Red Riding Hood(LRRH) cookie jars currently in the market.
Steps to make Cute Little Red Riding Hood Icebox Cookies:
- Warm the butter to room temperature, cover with plastic wrap, and microwave at 600 W for 30-40 seconds to soften (adjust to your microwave strength to make sure not to let it melt too much).
- Whip into a cream.
- Add the light brown sugar in 2-3 batches, blending it into the butter with each addition.
- Stir in the light brown sugar, add the egg yolk, then evenly combine.
- Mix well.
- Sift in the cake flour.
- Switch to a rubber spatula and mix with a cutting motion.
- Continue until the dough becomes crumbly and smooth, as shown.
- Divide the dough into 4 portions. You should have close to 548 g, so each portion should be about 138 g. The weight may vary slightly depending on the amount of sugar and the size of the egg.
- Color one portion with food coloring. As shown, I added the amount that clung to a toothpick 5 times.
- Color the other portion with cocoa powder.
- Mix the colored dough separately with a rubber spatula with a cutting motion, and it should slowly come together into a ball.
- There should now be red, brown, white "A", and white "B" balls of dough.
- Use the red dough for Little Red Riding Hood. With the brown dough, use 3/4 for the wolf's face, 1/8 for the wolf's body, and 1/8 for Little Red Riding Hood's hair.
- With the white dough "A", use 2/3 for Little Red Riding Hood's face, and 1/3 for the border around her head. Use white dough "B" for the border around the wolf's head.
- Roll the dough for Little Red Riding Hood's face into a long log. It should be slightly ovular.
- Roll 3/4 of the brown dough for the wolf's face into a slightly squarish ovular log, and place into the freezer. Let sit for approximately 20 minutes, and transfer to the fridge after 20 minutes.
- Make Little Red Riding Hood while the wolf's face is chilling.
- Roll 1/8 of the brown dough long and thin for Little Red Riding Hood's hair. Stick it in the freezer for about 5 minutes. Doing so will make the dough easier to handle.
- Take it out of the freezer, and make an indentation in the side to inlay the dough for the hair.
- Cut the dough for the hair in half.
- I made two groves on the side. The dough will fall apart if you press down too firmly on the dough. But if it falls apart, gently press the parts back together.
- Arrange the dough for the hair on top of the dough for the face as shown.
- Wrap the dough in parchment paper, and roll it to seal any gaps.
- The face is done. Let it sit in the freezer for 20 minutes, and then transfer it to the fridge.
- Take the dough for the wolf's face out of the freezer. It may break apart if you freeze it for too long, so transfer it to the fridge after 20 minutes to make shaping easier.
- Make a slit halfway through the dough as shown.
- Cut into the dough once more at a diagonal to cut out a narrow triangular stick. Cut into the same part to make 2 of these.
- These will be the wolf's ears. The cut element will become the mouth.
- This is how it should look. Freeze the dough for the wolf's face in the freezer for a while.
- Take out the dough for Little Red Riding Hood's face, and roll out the red dough to the same length as the face. It should be about 2 mm thick.
- Roll out white dough "B" to wrap around the wolf's head to the same size as the dough for the wolf's face. It should be about 3 mm thick.
- As shown in Steps 31 and 32, fold parchment paper around the edges of the dough, then roll it out for a tidy edge. Let it sit in the freezer for 5 minutes.
- Cut the dough to fit around the wolf's face. One strand for between the ears…
- …and one for inside the mouth.
- Fill the space on both sides of the ears as well. Press down on it to fill in the gaps.
- Use 1/8 of the brown dough for the wolf's body, and shape it into a square log. Store in the freezer.
- Now make Little Red Riding Hood's cape.
- Place the dough for her face on top of red dough cut to the width shown.
- Since the dough is chilled, it should be easy to handle. Cut the dough with a knife and make the hood as shown.
- Roll the dough in parchment paper, maintaining the triangular shape of the hood on top.
- Shape the sides of the face with your fingertips. Roll the bottom of the dough back and forth to adjust the shape of the face.
- Press down on the triangular part of the hood with the side of a box of plastic wrap or aluminum foil to make a perfect triangle.
- Now the dough has come together nicely. Chill it in the freezer.
- Take the dough for the wolf's head and body out of the freezer, and flip it upside down. Since it should be rock hard from freezing, the ears shouldn't get damaged from the weight.
- Pack the white dough against the sides of the body as well…
- …then wrap it up in the remaining white dough.
- Prevent any gaps by pressing down firmly and adjusting the shape, then store in the freezer. Transfer the dough from the freezer to the fridge after 20 minutes.
- Take dough for Little Red Riding Hood out of the freezer, roll out 1/3 of white dough "A", then wrap it around the red dough.
- Press the dough together with parchment paper after rolling. Adjust the shape, then stick the dough in the freezer.
- Cut the wolf dough into 5 mm thick slices. Preheat the oven to 180℃.
- It should be solid enough to slice from chilling, but if it seems soft, stick the dough in the freezer and keep an eye on it.
- Arrange the cookies on a baking tray and stick on sesame seeds with the pointed ends angled downwards to give the wolf angry eyes.
- Refer tofor how to stick on the sesame. - - https://cookpad.com/us/recipes/147333-adorable-strawberry-freezer-cookies
- Bake in an oven preheated to 180℃ for 17 minutes. Adjust the cooking time according to your oven.
- Open up the oven about 8 minutes after baking, and cover with aluminum foil to keep the cookies from over-baking.
- The wolves are done baking.
- Cut the Little Red Riding Hood cookies into 5 mm slices as well.
- Use black sesame for Little Red Riding Hood's eyes. It's also cute to bake without the sesame, then use chocolate to draw various faces.
- Bake along with the wolves. (See Steps 55 and 56.)
- Proceed with decoration after baking and cooling completely.
- You can make a grannie wolf by drawing on glasses and a hair bonnet with white chocolate. Draw a cute little mouth on Little Red Riding Hood with chocolate.
- They are done. Wrap them up after the chocolate has set completely.
Ellen Supnick, who with husband Mark wrote The Original gold should show normal wear. Little Red Riding Hood is inscribed on the bottom of her skirt. Etsy uses cookies and similar technologies to give you a better experience, enabling things like Help little red riding hood to collect enough cookies for the feast and find her way through the cookie maze! Noi utilizziamo cookies per pubblicizzare le raccomandazioni di contenuto e le misure di traffico. Read reviews from world's largest community for readers.
So that’s going to wrap it up with this exceptional food cute little red riding hood icebox cookies recipe. Thanks so much for reading. I am confident you will make this at home. There is gonna be interesting food in home recipes coming up. Don’t forget to bookmark this page in your browser, and share it to your loved ones, friends and colleague. Thank you for reading. Go on get cooking!